Lots of Pictures


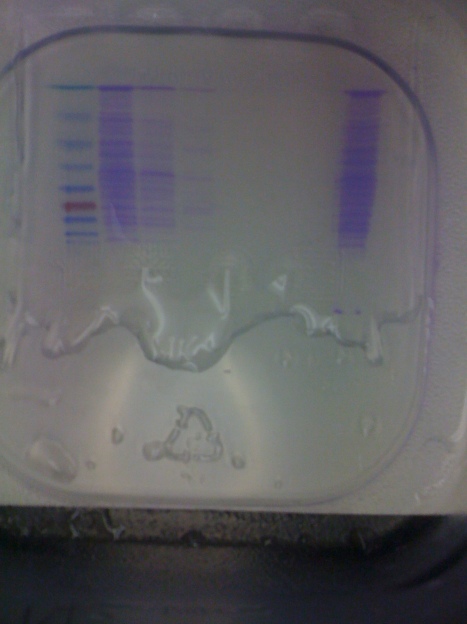
This past week, I dried my SDS page gel. Despite my laying the gel on TOP of the sealing gasket instead of underneath and having to rehydrate and dry my gel again, it came out in one piece.

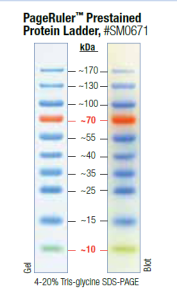
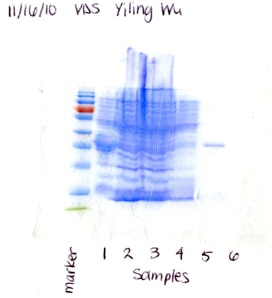
Lane 1: 7ul Prestained protein marker #SM0671

Lane 2: 20ul Sample 1 (cell lysate after induction)

Lane 3: 20ul Sample 2 (soluble fraction)

Lane 4: 20ul Sample 3 (flow through)

Lane 5: 20ul Sample 4 (wash)

Lane 6: 20ul Sample 5 (elution 1)

Lane 7: 20ul Sample 6 (elution 2)


In lane 6, you can see one clear band which means the Ni-NTA resin successfully stripped away any junk protein, leaving only the purified protein.

In lane 7, you don’t see anything because the second elution step washes away even more protein.


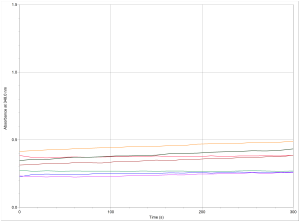
Also this week, I did my first enzyme assay:

Protein Expression + Purification + SDS Page Gel


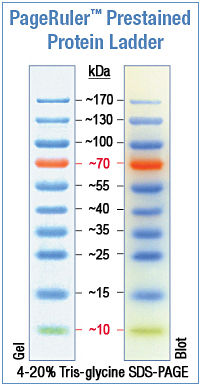
Fig. 1 - Protein Marker #SM0671 Lot: 00061923

Fig. 2- The SDS Page Protein Gel in 1X TGS Buffer Stained with an Imperial Protein Stain. Lane 1 – Protein Marker Lane 2- Protein Purification Waste Lane 3- Protein Purification Wash Lane 4- Elution I (11/2/10) Lane 5- Elution II(11/2/10) Lane 6- Elution I from Protein Purification on 10/29/10 Lane 7- Elution II from Protein Purifcaiton on 10/29/10 Lane 8 Sample #2 (Soluble Fraction after Sonication) from Protein Purication on 11/2/10

This week I had to do another protein expression on Monday and Purification on Tues, It was really quick. This time I wanted to do things different and actually take time to babysit my growth to .6 but again I had to go to class. When I got back to add my IPTG my growth was 1.125 and 1.197 for flask A and B with the LB and my CA7 BL21 bacteria cells respectively.  I really believe that adding the IPTG at .6 is the key component to obtaining an excellent yield from purification.  The CA7 Protein I have must have the best function at that growth number and missing that number is critical for the bacteria to begin making more CA7. After Purification, I worked on the SDS Page Gel/Protein Characterization. I realized that in my elution from 10/29/10, I had a low protein yield. When I did protein expression and purification again, I obtained a higher yield, but it was not excellent. The next step is to protein concentrate to get all the other proteins that are in the elution I from the second expression and purification. Calculations from Protein Purification will be updated on the blog sometime this week as well. After that enzymes assays will occur and I am crossing my fingers hoping that my protein is functional or back to expression. There is nothing much to rehash as I have done this process before last week. The only thing that was sort of new was the page gel, but the class did that last year. Once I began the gel, everything began to flow back in my mind. Oh! I pHed the Elution Buffer for everyone. Yeah! Also, this week I ran 8 GOLD Libraries. The Images and data form the aggregate is on Google Docs, but the libraries that are on the aggregate are the CB306, ChemBridge, KINA, LOPAC and ZINCL Libraries. I had to use multiple blades and uses mulitple processes on that blade just to get all of these libraries run. I had 5 libraries from the CAII Protein, but after cloning and a new protein I had to change my GOLD protein and start all the way over. Hopefully I have enough functional protein and a functional enzymes that I can do some testing.

What a Week- RE Digest, Protein Expression, Purification


Let’s Travel all the way back to 10/22/10. After I performed RE Digest for the second time, I had an epiphany. I have a new enzyme, CA7, so the RE Enzymes used from CAII probably will not work on my new protein. Let’s Check. Yes, it does not cut in the manner it would on CAII.
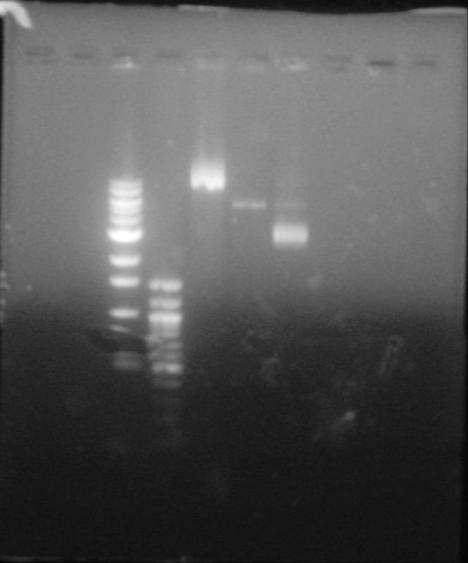
Lane I and II are skipped. Lane III and IV are the 1 kb and 100bp DNA Ladders respectively. Lane V is the uncut control plasmid of pNIC-Bsa4 with the stuffer fragment. Lane VI- is the DNA from Cloning of Colony 3 on the Master DH5alpha master plate. Lane VII- is the DNA from Cloning of Colony 7 on the Master DH5alpha master plate.

This was reassuring because I beginning to believe I was doing RE Digest improperly. Well after this, I sent off the sequence from Cloning of Colony 7 and Colony 4 to the ICMB Core, because Colony 7 resulted in four N’s for its whole sequence when the pLIC primers were used. While waiting on the results to come back, I put the DNA from Colony 3 and Colony7 in BL21 expression vectors and they came out great! I should have taken a picture of them, for everyone to see. Colony 7 looked weird again. The plate from Colony 7’s DNA from Cloning did not output  distinct colonies as Colony 3 did. Now, I did add all 25 ul of the Transformation solution to the agar plate, so it could have been overcrowding in Colony 7. After this was complete, I began this week looking at the DNA sequences obtained from the core. Colony 4 came out again with CA7, but for Colony 7 from Cloning, the core gave me a sequence with 4 N’s. I am beginning to believe that Colony 7 from Cloning has the CA7 DNA in solution, but not in the pNIC-Bsa4 Vector.  I choose Colony 3 to grow up my overnight culture, and then placed them in the 2 500 ml LB Broth for my OD Readings.  At 600 nm,  at 759 am the ABS value was .098 for B, and at 8:10 the ABS value was .110 for A. I was not able to babysit and check the OD values properly because I has class during the time of OD value check. After 2 hours, I came to check the OD values again and the 1st OD Value (ABS at 600 nm) at 11:30 was 1.606 for A and for B it was .856. (A and B come from the 2 500 ml flask that the solution of LB and bacteria were in.) After this, I added my IPTG and allowed it to incubate for 4 hours. After about 30 minutes, I realized I did not add my Kan to my new LB Solution, so I went on and added the Kan. Once that was finished, I put the LB in two tubes to allow them to centrifuge 20 min at 6000 g. The pellets weighed 48.17 grams. The pellets were resuspended and sonicated 2 days after that. Some of the solution spilled during sonication. After sonication the proteins were centrifuged again and then on to protein purification. The most tricky part of protein purification was the  balancing the ph correctly because the HCL and NaOH are so concentration and a drop could totally change the pH of the protein. Question: Were my protein’s denatured? My pH went down to around 5.2 went I added the HCL, could that have been the source of the low protein yield that was to come after purification. Once the pH was at the proper value, I added the 1ml of the Ni-NTA slush to the solution and allowed it to incubate for 45 minutes. Another issues that could have arose was that I did not incubate as often as I should have to allow the protein to bind to the Nickel. Next Time, I will put the ice bucket directly in front of  me and invert it every 5-10 minutes, so the Nickel will stick to the protein. I performed the rest of the task of protein purification and when the elution were taken I used the buffer that had 150 mM of NaCl instead of the 300 mM NaCl. 150 mM is close the the physiological concentration, but 300 mM creates the best protein binding environment to the Nickel.  Once purification was complete, I Nano-dropped the solution to find out my protein yield. The yield for elution one was .110 at the highest. I forgot to keep the picture of the graph for that because I Nano-dropped again an kept keeping positive and negative protein concentrations. So I am back to growing up my bacteria for expression. I went into lab today to make LB and autoclave it, but the autoclave was having issues. The solutions of LB are made, but they have not been autoclaved. When I do expression the next time I have to be more careful of what I am doing and make sure I have time to babysit the LB to grow to the proper value of .6.


Running Gels after PCR for pNIC-Bsa4


Zoe asked:

I am coming in to make my gel and run the samples. I was looking at the protocol, and it says “Use 100kb ladder as marker” Then it says right under that 100 bp ladder. Which should we use? How much blue juice should I put in each sample (2 uL?) ?  How long do we need to run the gel for and how far down should our samples be?
Thank you,
Zoe
Dr. B says:
Yes – TYPO – should be 100 bp ladder.

amount of blue juice depends on the volume of your sample.
Remember to only take HALF of you PCR sample.
So that should be 12.5 ul if you started with 25 ul.
Then BLUE JUICE is 6X concentration stock and you want it to be around 1X final in the tube..
So, 12.5 divided by 6 is roughly 2 ul.

The blue dye front of you gel should be at least 3/4 th of the way down the gel.

Dr. B

Not much progress…


10/3/10

I hope my PCR was a bigger success than the football game this weekend. Anyway, Thurday I started on my primer design. I couldn’t figure out how to do the ending part, so I haven’t turned it in yet. I figure I can get help during the 14 hours I’ll be in lab this week. Yes, I am THAT behind. Friday I did PCR for my target…first try. Someone was supposed to freeze it for me, since I had to go to Dallas. I am coming in to run it on the gel tomorrow, so I will update again after I get the results. Hope everyone has a good week. I will be seeing you lots this week :]

10/7/10

Below are the results to my PCR. This is the 2nd half of my sample because I ran the first gel backwards then dropped it on the floor. Luckily, I had this other half. It worked. The magnesium definitely had an affect as you can tell.  

Since lane 6 had the most DNA, I optimized the PCR protocol. I put 4 mM of MgCl2 in each lane except for the control. The bands turned out very bright which is great because that means I have a lot of DNA to work with for cloning. One strange thing happened though. Candace and I ran our gel at the exact same time, and we were the only ones to use the power source. However, mine ran WAY slower. Dr. B said that I could have added more agarose or that the TAE may have been stale. I did use TAE that was from yesterday already in the set-up since I didn’t want to waste any. From now on I am always going to use fresh TAE, though.

You know you’ve been in lab too long when…


9-13 PCR CA7 10 samples Lane 1: 100 bp ladder Lane 2–11: 10ul CA7 Lane 12: No DNA Control

Me: I’m going to PCR to study.

Friend: Um… don’t you mean PCL? I think you’ve been in lab too long, Yiling.

This past week I gel-checked my 10 samples of CA7. Take a close look at the 12th lane. There’s nothing in it! That’s my control, and it’s the first time EVER that I haven’t contaminated it! Lane 8 looks kind of empty too, but I blame that on my pipetting. The reason I made so much DNA is that my previous transformation failed, so I made more DNA in the hopes that the competent cells will pick it up.

I also did the transformation protocol again, but with leftover DNA. It didn’t work. Next, I ran a gel check on some cut pNIC-Bsa4 to see if I had been doing something wrong on the accepting vector prep – it looked OK. Maybe I’ll just steal the water baths and create a laboratory in my dorm room.

Then we ran out of pNIC-Bsa4, so I had to Midiprep to make more. It didn’t work either so we still don’t have any pNIC-Bsa4. After precipitating the DNA with isopropanol and centrifuging it, I couldn’t see the pellet. In the end, Nanodrop showed no max wavelength.

The next step would be to attempt transformation again!

Candace’s Restriction Enzyme Lab Results


Lane 1: skip Lane 2: 1kb DNA Ladder Lane 3: Uncut Plasmid Lane 4: PvuII Lane 5: EcoRI Lane 6: PvuII + EcoRI

The restriction enzyme lab was very interesting and I learned a lot from this process. Restriction enzymes are enzymes that can cut DNA at specific points on the strand.  The restriction enzymes used were PvuII and EcoRI. EcoRI incubates at 37 degrees Celsius and denatures at 65 degrees Celsius for 20 minutes and works  with NEBuffer 1,2,3,4. PvuII incubates at 37 degrees Celsius and does not denature at any temperature and also works with NEBuffer 1,2,3,4. The lanes where comprised of:

Lane 1: skip

Lane 2: 1kb DNA Ladder

Lane 3: Uncut plasmid

Lane 4: PvuII

Lane 5: EcoRI

Lane 6: PvuII + EcoRI

In Lane 2, the PvuII has two distinct bands and in the Lane 3 the EcoRI has 1 distinct band. The bands do appear as expected and truly reflect the nature of the restriction enzymes. These bands on the gel electrophoresis are similar to the nature in which the restriction enzyme acts. EcoRI only has one band which still allows the plasmid to stay somewhat intack and heavier; that is why it pairs up with the uncut plasmid. Unlike EcoRI, PvuII makes two cuts and can be seen based on the lines made in the electrophoresis.

PCR of Scaled up CA7 – Note to Self: Need to do DPN1 Treatment!!


The experiment was my PCR with CA7 for pNIC-Bsa4 cloning (scaled up to 50 ul). The concentration of Mg2+ I used was 6 mM.

Lane 1:  Skip
Lane 2: 1 kb ladder
Lane 3-7:  20 ul CA7 (6mM Mg2+)
Lane 8:  No DNA control

Lanes 5-7 look really good, but lane 8 definitely has some DNA contamination, probably from when I was pipetting my samples into the gel (the samples like to float in the 1 x TAE buffer from lane to lane… I call it lane-hopping.)

Lanes 2 & 3 have fainter bands of DNA. This again was probably due to my pipetting. I was a little over-enthusiastic when pipetting lane 3.

The dark bands are my target (coding) region of CA7 that the PCR amplified. Above the dark bands you can see some junk DNA that PCR also amplified. This junk DNA probably includes non-coding regions of the CA7 gene that the restriction enzymes were still able to target.

Below the dark bands, you can see some faint bands near the bottom of the gel. These faint bands are probably leftover dNTP or primers because they are much smaller than the dark bands of DNA.

For this gel check, I was supposed to use the 100 bp ladder but used the 1 kb ladder instead. Thankfully, this doesn’t affect how my lanes turned out because the DNA ladder just shows how big the DNA is.

The next step would be to pool my samples into one and run it in three lanes (with the correct DNA ladder). Then I must DO DPN1 TREATMENT!!!! (because my template plasmid has Kanamycin resistance). After DPN1 treatment is PCR cleanup.

PCR- it’s finally over…I hope.


KRJ_9/2/10 pNIC cloning gel

KRJ_8_31_10 pNIC cloning gel-1

The gel from 8/31/10 was Run 1 of PCR cloning for the Fall. The top bands are exactly what I’m looking for but unfortunately the bottom band seems to be some sort of contaminant. If it weren’t so dark, it might have been primer dimers but that is probably not the case. The 2nd Run on 9/2/10 showed much better results. The dark bands that represented  Zhang was present and the lower bands were significantly lighter or not even there. The procedures used were exactly the same (annealing temp of 60 degrees for 20 cycles) so something must have just been contaminated when it was used on the first run.

PCR results example post


Dr. B - PCR of pGBR22 coding region

Lane1: empty
Lane2: 100 bp ladder
Lane3: 20ng template
Lane4: 50ng template
Lane5: 100ng template
Lane6: 200 ng template

Used M13F and M13R primers at 20 cycles

Troubleshooting:  why don’t I see a band in lane 5??