Spinning Down and MiniPrep Kit


Fig. 1- DNA Concentration of 33.3 ng/ul and the DNA grown up for this Nanodrop was from the bacteria growth in the 15ml tubes which cut the Oxygen supply.
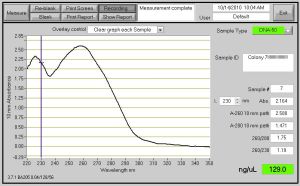
Fig. 2- DNA Concentration of 129 ng/ul and the DNA grown up for this Nanodrop was from the bacteria growth in the 14ml round bottom tubes which does not cut the Oxygen supply. Also, when spinning down the cells for this DNA, I did not take out the toothpicks.

I have 16 pictures from Nanodrop after I transformed, grew up the bacteria and Miniprepped them. The top 2 are posted, because I figured you would not want to see 16 pictures. After the Masterplate grew up, I took a tooth pick, and sequentially added each numbered bacteria colony to a numbered tube. Each Numbered tube had 5ml of LB with 50 ug/ml Kanaymycin (5 ul of Kanamycin per tube or 250 ng for all the 8 tubes.) I did not spilt up my bacteria growth and grew them up for 8 hours straight. After my bacteria grew, I took out the toothpicks and spun them down at 5000 rpm for 5 min. Next, Mini-Prep was performed on the DNA and then came the fun part. After mini-prep (I eluted in 50 ul), I proceeded to the dreadful Nanodrop. The highest DNA Concentration for the first time was 33.5 ng/ul. So, guess what, I had to perform these steps all over again. Although, I had to repeat some steps were changed along the way. When I was growing up my bacteria, I used a round bottom tube this time instead of a 15 ml colonial tube. The round bottom tubes are better because they have a loose top which enable the bacteria to consume more Oxygen for growth and the round bottom tubes are much CHEAPER than the other tubes. When spinning down the round bottom tubes, I had to parafilm the tops of them, so the liquid was secure in the tube. The first time I spun down in the 15ml tubes, I took out the toothpicks, but the second time I did not. Nothing was effected. Miniprep was done next, and the first time I eluted in 50 ul ph 8.0 water, but the second time I eluted in 30 ul of Tris-HCl. On average, my concentration of DNA from the first Miniprep was 26 ng/ul and for the second Mini-Prep it was about 52 ng/ul. In conclusion, the second time I minipreped with less elute I got a stronger concentration of DNA for use of RE Digest and DNA Sequencing.  Also, for RE Digest the enzymes I will be using are SspI and BsrgI.

Cloning (Prep pNIC, Cohesives, and Transformation and Annealing)


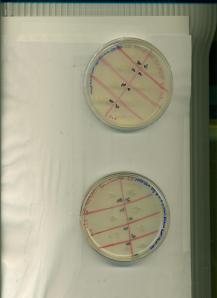
Fig. 1- Image of the Master Plate after transformation was successfull and 8 colonies were hand selected to put placed in a numbered grid (1-8). When DNA is grown up, it will be easier to go back and refer to the colony that has the insert or not, because the numbered tubes help organize colony growth and cloning. The agar plate on the bottom contains the protocol mix of Cohesive Generation solution of the Accepting Vector (2 ul) and of the CAII Insert (4ul). The agar plate on the top contains my own remixed amount of accepting vector(2ul) and CAII Insert(8ul). Note: Each Agar Plate contains 5% Sucrose and Kanamycin Resistance. The Sucrose is for negative selection of colonies without the insert.

Yes! Bacteria grew up on my original plate and I had enough colonies to make a master plate. When I performed all the steps to get to the image that is shown, I had to prepare my pNIC-Bsa4 accepting vector, so that it is empty and has the chance to take up my plasmid. After that, I had to perform cohesive end generation on my CAII insert and my pNIC-Bsa4 accepting vector. I did not know what co-hesive en generation was so I looked it up. Dictionary.com gave this definition. Cohesive End – Single-strand extension on each end of a duplex DNA molecule that is usually produced by restriction endonuclease digestion and which facilitates ligation of two similarly cut DNA molecules. Called also sticky ends. Also, the t4 DNA Polymerase Buffer is the NEBuffer 2. This was found in the catalog, in the VDS Solutions cabinet. When annealing and transformation was ready to be accomplished I did two different mixes of Accepting Vector and CAII Insert, one from the protocol and another from whatever I wanted. The DH5aplha cells I used were the Invitrogen One Shot Max Efficency Tr1 cells. When all my solutions were prepared and I could spread my bacteria with the plasmid on my plate, I used the metal loop, which I heat steralized and let sit for 30 sec so it does not burn my bacteria. After this was incubated overnight, it grew up about 15 colonies, then was stored in the fridge. On Monday, October 11th, I picked 8 colonies to be put on a master plate and grew them overnight, so I could grow them up in tubes next.

Kan+Sucrose Plates Test


Kan+Sucrose Test Plate

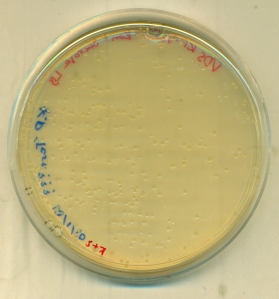
Because Kim got a sort of weird colony on her Kan+Sucrose plates, I decided to run a test with one of the new plates to make sure it that there wasn’t something wrong with them. Kim picked a colony from an old Kan+Sucrose plate and grew it up in 5mL of LB+Kan. Once some bacterial growth was seen, some of the solution was transferred onto one of the new Kan+Sucrose plates, spread, and allowed to grow overnight. This morning, when I checked the plate, there was colony growth (see picture). This result leads me to believe that these plates were made correctly and can be used.